
One of the most critical steps in homebrewing is being able to chill your wort fast. The best wort chiller options you have will give you a better tasting beer, and prevent bacteria growth to keep your beer healthy.
Before you can bottle your beer, or throw it in a keg or growler, you need to make sure your beer tastes good. And it all starts with the wort. Even before you ferment (or secondary ferment) your beer you need to make sure your wort is made and chilled properly.
Top Picks If You’re In A Hurry…


B3-36A 40 Plate Beer Wort Chiller 2.9 gpm Garden Hose x 1/2″ Hose Barb NPT 18.3″x2.9″ Stainless Steel


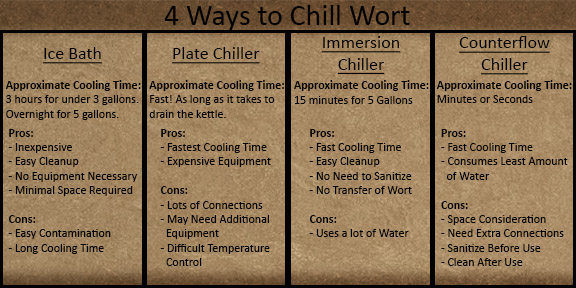
There are four ways you have to chill wort. An ice bath, a plate chiller, counterflow chiller, and an immersion chiller. There are pros and cons to each method, but first we want to explain why it is important to rapidly chill your wort. Although you don’t technically need a wort chiller it really is one of the most important pieces of equipment for homebrewing.
Why Chill Wort Quickly?
At the end of a boil it is important to chill your wort down quickly. Cooling your brew down quickly is not only beneficial for the taste of the beer, but is also important for health reasons.
When the wort is above 140 degrees and still hot bacteria and wild yeasts are inhibited. However, those yeasts and bacteria are very susceptible to oxidation damage as the wort rapidly cools. Also, sulfur compounds are created while the wort is still hot. Therefore, you need a good method to rapidly cool your brew.
If the wort isn’t cooled quickly enough dimethyl sulfide will continue to be produced in the wort without being boiled off. This will have a big impact on the flavor of your beer. You want to rapidly cool the wort to below 80 degrees before oxidation or contamination can occur. This is one of the keys to eventually get a good tasting beer.
Rapid cooling the wort also forms the Cold Break. Cold Break is the crud that precipitates out of solution when you rapidly cool wort after the boil. A good cold break looks like miso soup or egg drop soup, with lots of little flecks floating around within otherwise clear wort. This is composed of another group of proteins that need to be thermally shocked into precipitating out of the wort.
1. Rapidly Cool Wort with a Plate Chiller

Product Attributes From Amazon
- 304 Stainless Steel Plates with 99.9+% Copper Brazing, Design Pressure: 3.0 Mpa (435 psi)
- B3-36A Model Refrigeration Capacity: 4-15KW (17,000-61,200 BTU/hour)
- Recommended Max Water Flow Rate: 18.5 gpm, Design Temperature: -195°C to +220°C (-319°F to 430°F)
- M8-1.25 Mounting Studs welded to bottom of unit for clean installations
- Lifetime warranty against manufacturer’s defects
A plate chiller is an effective way to rapidly reduce wort to pitching temperatures. Both compact and economical, a plate chiller is more efficient than both an immersion chiller and other counter-flow designs. A plate chiller can have a cooling time of 10 to 15 minutes (depending on the season) for a 5 gallon brew. Some say that their wort is chilled in about 5 minutes but this is not verified.
Either way, the rapid cooling time is a plus for the argument of a plate chiller. There are some downsides to a plate chiller. One is that the brew day can be slowed down because of the time required to clean a plate chiller. However, a backflush assembly can be purchased for easier cleanup. You may also need a high-temperature pump to push the wort through the plate chiller if gravity won’t allow for it. Add a plate chiller, backflush assembly and possibly a high-temperature pump together and this brewing equipment could be beneficial for your brew.
Single Pass Chilling
After the boil, or whirlpool, you drain from the kettle through the plate chiller and into the fermenter
Advantage: The wort cools in the time that it takes to empty your kettle. This could be even faster than a counterflow chiller.
Disadvantage: It is difficult to accurately control the temperature. You would need to know the temperature of your water to know how long it will take your wort to cool. If your tap water is too warm you would have to either cool it down or cool the fermenter to pitching temperatures.
Recirculating Wort With A Plate Chiller
Instead of running wort directly into your fermenter the wort is recirculated back into the kettle until you reach the desired temperature. This is an alternative way to operate a plate chiller.
Advantage: Easier temperature control. The entire batch is cooled at once and locks in the hop flavor and aromas.
Disadvantage: Recirculating takes longer than single pass chilling. A pump is also required to return the wort to the boil kettle.
2. Cooling With An Immersion Chiller

Product Attributes From Amazon
- 50′ Copper Tubing
- 24″ Overall Height
- 9 1/4″ Coil Diameter
- 13″ Coil Height
- High quality brass garden hose fittings included
An immersion chiller is made from coiled copper tubing and sits right inside the kettle. Wort is cooled by running cold water through the coils. A major benefit is that an immersion chiller is easy to use and keep clean. The immersion chiller can be connected to either your garden hose or your kitchen faucet. If you do connect to your kitchen faucet you may need an adapter that can connect to your faucet.
There are some alternatives you want to consider such as buying 25 or 50 feet of tubing or tubing that is 3/8″ or 1/2″ diameter. Another choices is whether you want it in copper or stainless steel. Your choice will likely depend on the size your brew and how much you want to clean. An immersion chiller can cool your wort to pitching temperature in about 15 minutes
Advantage: No need to sanitize! Since you’re submerging the immersion chiller into boiling wort any bacteria present will be killed. When you’re finished you can rinse the copper coils with hot water. A copper immersion chiller is also great for beginners and novices.
Disadvantage: An immersion chiller uses a lot of water! But it still uses less water than an ice bath.
3. A Counterflow Chiller

Product Attributes From Amazon
- 25′ of 1/2″ Copper Tubing
- 14″ Overall Length
- 7″ Coil Height
- 13″ Coil Diameter
- Garden Hose Fittings
A counterflow chiller has a small diameter copper tube that is inside of a larger tube. Wort flows through the small tube from the kettle while cold water flows through the larger tube in an opposite direction. The result is the wort cools in a shorter amount of time and also allows for the best possible cold break.
The counterflow chiller cools wort to pitching temperatures in minutes, or even seconds! This means that almost all proteins and tannins that may be present will drop out of the solution as the wort is chilled and siphoned into the fermenter
Advantage: Wort is chilled in minutes or even seconds! A counterflow chiller consumes less water and chills at least twice as fast when comparing it to a copper immersion chiller.
Disadvantage: There needs to be enough of a height difference between the kettle and fermenter to allow for a counterflow chiller. You’ll also need a ball valve on your brew kettle. Counterflow chillers also need to be sanitized before every use and cleaned after every use.
4. Chilling Wort With An Ice Bath
If you are just starting out in homebrewing or brewing in small batches (1 to 3 gallons) using an ice bath as a wort chiller works just fine. It is the least complicated method with no equipment except for a large tub (even a sink or bathtub) to chill wort. Although, we might want a dedicated tub to reduce the possibility of contaminants in the wort.
The benefits of an ice bath are that there is no equipment involved. Only water and ice. The downside is that the time to chill wort to fermentation temperatures is greatly increased. A one gallon brew can be cooled in an hour; 3 gallon in three hours; and five gallons should be cooled overnight. Another thing to consider, especially, if you are doing larger brews is the risk of injury. Moving 5 gallons and 45 pounds of very hot liquid could be very dangerous!
There is also a risk of contamination. Make sure that you do not let any water from your hands or the ice bath into the brew. Also, don’t use commercial ice as that ice can also harbor dormant bacteria which can spoil your beer.
Tip: A few days before brewing fill a couple of milk jugs (1 gallon) with water and freeze them. The larger ice blocks will keep the water colder and the ice won’t melt as fast.
Final Thoughts On The Best Wort Chiller
As with anything, your choice of wort chiller comes down to a personal preference. Whether you use an ice bath or decide to spend the money on a plate chiller, copper immersion chiller, or counterflow chiller it is important to cool your wort as fast as possible. The batch size, available space, and budge are all factors when deciding which wort chiller is the right one for you. Happy Brewing!